Why Pre-processor?
🔁 1. Dynamic Value Generation
👉 “System-generated fields”
Example:\
For every sync, you want to send a tag like:
ITEM-1, ITEM-2, ITEM-3
Why Pre-processor?\
Because this requires a counter (loop) — mapping cannot generate sequence-based values.
❓ 2. Conditional Field Inclusion
👉 “Send only if meaningful”
Example:\
Send product_type only when category exists
- If category = “Clothing” → send
- If category = null → don’t send
Why Pre-processor?\
Because this needs an if condition — mapping cannot decide whether to include/exclude fields.
🔄 3. Data Restructuring
👉 “Change format of data”
Example:\
Input:
["v1", "v2"]
Output:
[{"note": "v1"}, {"note": "v2"}]
Why Pre-processor?\
Because this requires changing structure (loop + transformation) — not just direct mapping.
“Whenever data needs to be generated, filtered, or reshaped, we use a Pre-processor.”
\
Scenario:
Assume you receive 3 products from an external system (PIM).
You need to:
- Add tags → ITEM-1, ITEM-2, ITEM-3
- Send product_type only if category exists
- Convert notes into Shopify metafields structure
Step 1: Create the Workflow
Create a new Batch-type workflow
Step 2: Mock Source Data Using Code Runner
To keep things simple, simulate the PIM response. Add a Code Runner step. Paste the following code:
# Assign final output to variable “response” at the end.
response = [
 {
   "name": "Shirt",
   "category": "Clothing",
   "notes": ["v1", "v2"]
 },
 {
   "name": "Mug",
   "category": None,
   "notes": ["x1"]
 },
 {
   "name": "Notebook",
   "category": "Stationery",
   "notes": []
 }
]
Step 3: Add Loop
Add a Loop. Keep the cursor inside the iterable box and choose Code Runner Step from Data Hub -> {{1}}
👉 This loops through each product in the array
Step 4: Add Mapping (Shopify Create Product)
- Search for Shopify (Beta)
- Select your credentials
- Select Create a New Product API and click Next
- Payload Setup: Use loop item → {{2.items}}
Keep the cursor inside the payload box, click on plus icon before the loop and choose item from Data Hub. {{2.items}} is automatically populated. This means we are using every product (JSON object) as payload in API Call.
- In the Data Hub, Add Mock Data for Code Runner
[
{
  "name": "",
  "category": "",
  "notes": []
},
 {
  "name": "",
  "category": "",
  "notes": []
}
]
- Click on Add Mapping. name → title
- Click on Save and Exit to return to the workflows page.
Step 5: Understand the Requirement
Data we have:
[
 {
   "name": "Shirt",
   "category": "Clothing",
   "notes": ["v1", "v2"]
 },
 {
   "name": "Mug",
   "category": null,
   "notes": ["x1"]
 },
 {
   "name": "Notebook",
   "category": "Stationery",
   "notes": []
 }
]
Data we want to send:
For first product creation,
{
  "product": {
    "title": "Shirt",
    "tags": "ITEM-1",
    "product_type": "Clothing",
    "metafields": [
      { "namespace": "custom", "key": "note", "value": "v1", "type": "single_line_text_field" },
      { "namespace": "custom", "key": "note", "value": "v2", "type": "single_line_text_field" }
    ]
  }
}
For second product creation,
{
  "product": {
    "title": "Mug",
    "tags": "ITEM-2",
    "metafields": [
      { "namespace": "custom", "key": "note", "value": "x1", "type": "single_line_text_field" }
    ]
  }
}
👉 Notice:
- ❌ product_type is NOT sent (because category = null)
For third product creation,
{
  "product": {
    "title": "Notebook",
    "tags": "ITEM-3",
    "product_type": "Stationery",
  }
}
👉 Notice:
- ❌ No metafields (because notes = empty)
Observing carefully what we have and what we expect:
Requirements:
- Requirement 1: Generate “ITEM-\
” and send it in Tags - Requirement 2: If category is null, don’t send product_type
- Requirement 3: If notes are not empty, structure metafields as shown above; if empty, don’t send
Step 6: Add Pre-Processor
Now, let us implement these requirements one by one via the Pre-processor.
Requirement 1: Generate “ITEM-\
Click on Add Pre-processor.
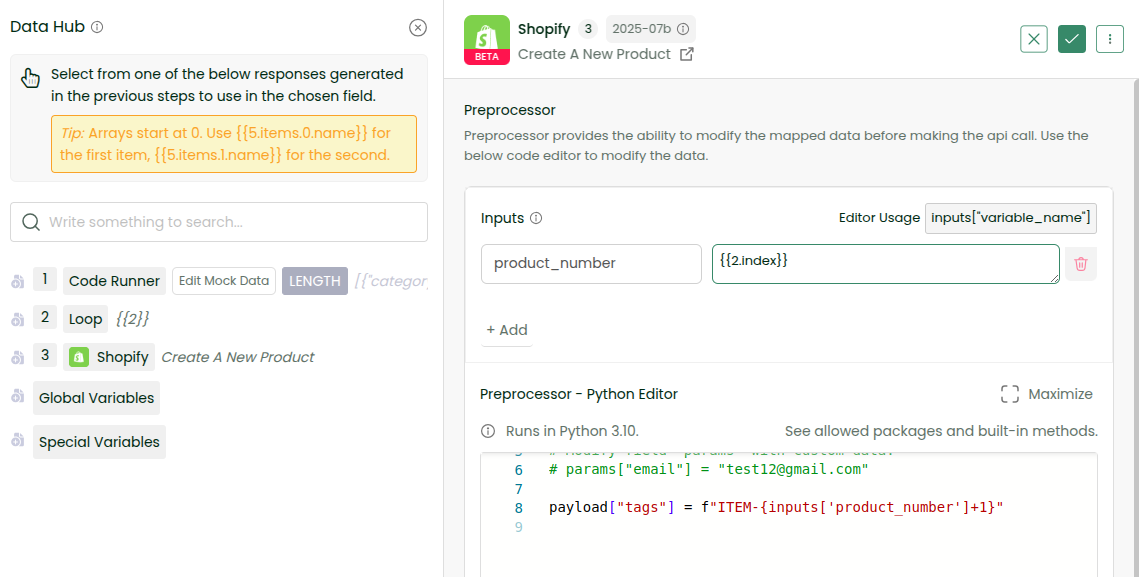
Let’s add the number based on the looping index. It starts from 0. Hence, we need to add 1 to it.
To use a looping index, we need to add it to inputs.
- Give a variable name
- For value, choose the index under plus icon of Loop Step in Data Hub.
In the screenshot, product_number is used as a variable.
The value needs to be incremented and sent in tags with prefix “ITEM-”, followed by the number.
To use the value of a variable, use inputs[“variable_name”].
You can copy paste the below code to your Preprocessor.
payload["tags"] = f"ITEM-{inputs['product_number']+1}"
Requirement 2: If category is null, don’t send product_type.
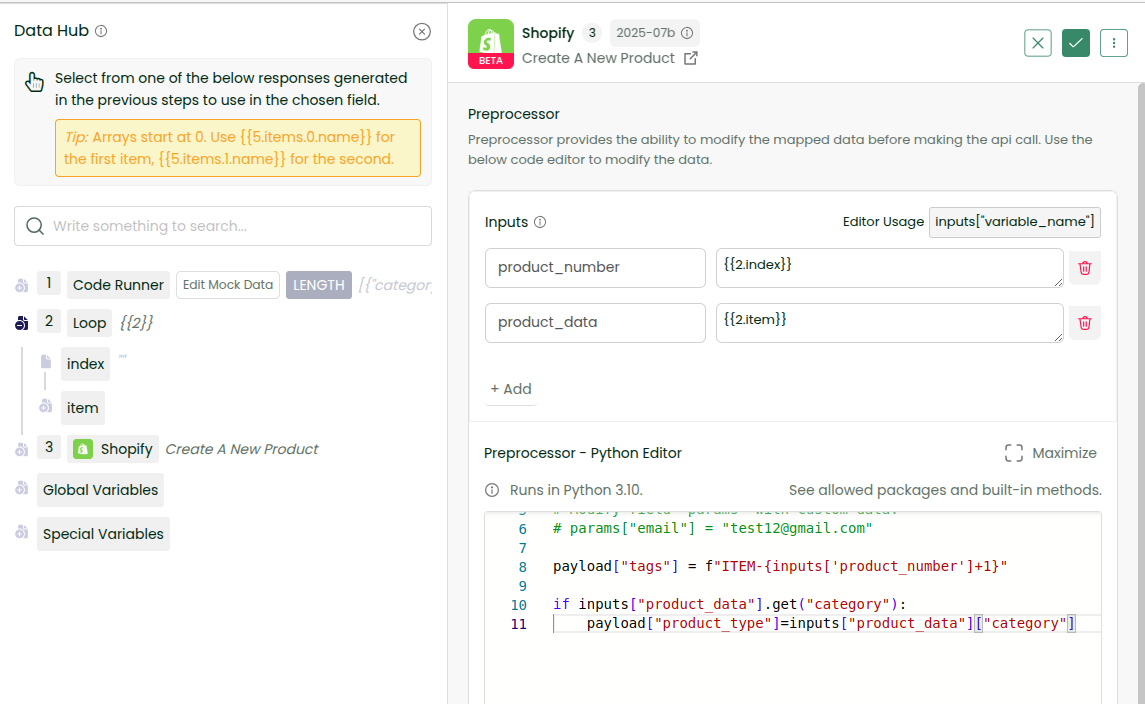
Click on Add under inputs. We need the product data (i.e., JSON object).
- Keep the variable name as product_data
- For value, choose the item under plus icon of Loop Step in Data Hub.
Now, in this product data:
- If category is None, we should not send product_type
- Otherwise, we should send it
To do that, add the below code to the Pre-processor
if inputs["product_data"].get("category"):
   payload["product_type"]=inputs["product_data"]["category"]
Requirement 3: Structure metafields
Since there are many usages of inputs[“product_data”]
To keep it simple, let us re-write as
payload["tags"] = f"ITEM-{inputs['product_number']+1}"
item = inputs["product_data"]
if item.get("category"):
   payload["product_type"]=item["category"]
Now, let us add the logic for metafields restructuring if notes exist:
if item.get("notes"):
   payload["metafields"] = [
       {
           "namespace": "custom",
           "key": "note",
           "value": note,
           "type": "single_line_text_field"
       }
       for note in item["notes"]
   ]
Cool, we have discussed some of the use cases of the Pre-processor.
Now, let us visualize the output.
Ensure that:
- You have turned on console logs for the API Call step
- You have checked Mapping & Modifiers Response
Save the workflow. Run the sync. Wait for a while, and then check the logs.
First API Request Information:
{
   "product": {
       "title": "Shirt"
   },
   "tags": "ITEM-1",
   "product_type": "Clothing",
   "metafields": [
       {
           "namespace": "custom",
           "key": "note",
           "value": "v1",
           "type": "single_line_text_field"
       },
       {
           "namespace": "custom",
           "key": "note",
           "value": "v2",
           "type": "single_line_text_field"
       }
   ]
}
Second API Request Information:
{
   "product": {
       "title": "Mug"
   },
   "tags": "ITEM-2",
   "metafields": [
       {
           "namespace": "custom",
           "key": "note",
           "value": "x1",
           "type": "single_line_text_field"
       }
   ]
}
Third API Request Information:
{
   "product": {
       "title": "Notebook"
   },
   "tags": "ITEM-3",
   "product_type": "Stationery"
}