FTP & SFTP Beta Systems allow you to connect, read, write, and manage files on non‑API‑based servers directly from Beta Systems.
This feature addresses performance issues in older implementations and introduces support for workflow variables.
FTP & SFTP Beta Systems offer
- Provides native FTP/SFTP connectivity within Beta Systems.
- Enables read/write operations with configurable size limits (up to 300 MB).
- Supports data format conversion (string, JSON, CSV, XML).
- Allows workflow variables to be used in FTP/SFTP steps.
- Improves execution performance compared to older systems.
Key Benefits and Value
- Reliability: Stable connections with enforced size limits.
- Flexibility: Read/write in multiple formats.
- Performance: Faster step execution compared to legacy FTP/SFTP.
- Security: SOC 2 & PCI‑compliant credential handling.
- Ease of Use: Simple credential setup and intuitive workflows.
Before you begin
Collect your server details first. You will need them to create a credential, and your server administrator or file-transfer partner usually provides them.
| You need | FTP | SFTP | Notes |
| Hostname | Required | Required | Enter the server name or IP only. Do not add http:// or https://. |
| Port | Required | Required | Ask your server administrator which port to use. |
| Username | Required | Required | The account used to sign in to the server. |
| Password | Required | Password or private key | For SFTP, you use one sign-in method, not both. |
| Private key | Not used | Password or private key | The contents of your .pem key file. |
| SSL/TLS setting | Required (Yes/No) | Not used | Choose Yes if your FTP server uses FTP over SSL/TLS (often called FTPS). |
Also confirm:
- The account has the right server permissions. The system can only do what the server account is allowed to do, for example, read a folder or delete a file.
- You know the full file paths. Every action uses full paths that start from the root directory, such as /home/folder/filename.txt.
Access in the platform: There are no role-based permissions for these systems at this time. Anyone who can use Beta Systems can use the FTP/SFTP Beta Systems.
Getting started:
Connect to your server
A credential is a saved connection to one FTP or SFTP server. You create it once and reuse it in any workflow. You can add a credential from the Systems page or directly while building a workflow.
The diagram shows the path from finding the system to running your first action.
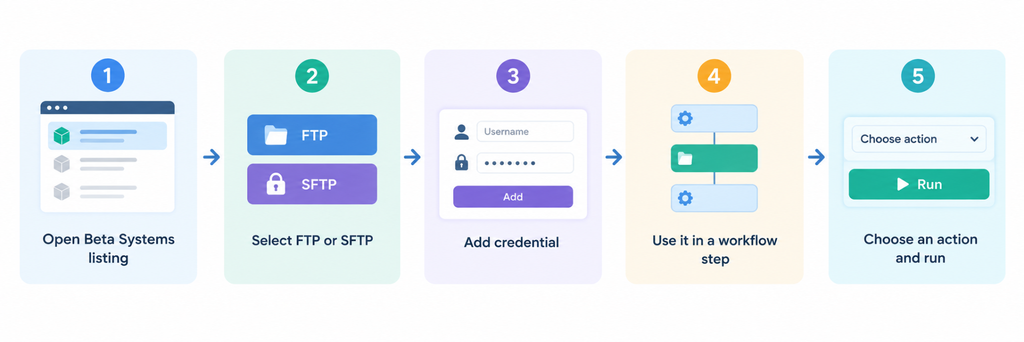
Find the systems
- Go to Systems Page.
- Open the Beta Systems listing.
- Look for SFTP or FTP..
Add an SFTP credential
- Select the SFTP system, from the Systems page or from a workflow.
- Choose to add a new credential.

- Enter the Hostname, Username and Port.

- Choose how you sign in:
- Password: enter the account password.
- Private key: open your .pem file in a text editor, copy its full contents and paste them into the private key field.
- Save the credential.
The credential appears in the credential list for SFTP and can be selected in your workflows.
Note: Only one sign-in method is shown at a time for SFTP, based on the option you use. You never need to enter both a password and a private key.
Security: Passwords and private keys are stored as sensitive fields. Never paste keys or passwords into workflow data, file contents or support tickets.
Add an FTP credential
- Select the FTP system, from the Systems page or from a workflow.
- Choose to add a new credential.
- Enter the Hostname, Username, Password and Port.
- Set FTP over SSL/TLS Support to Yes or No.
- Save the credential.
The credential appears in the credential list for FTP and can be selected in your workflows.
What you can do: available actions
FTP and SFTP offer the same eight actions. Read File and Write File includes data format conversion and a size limit; the other six work as they did in the older FTP/SFTP systems.
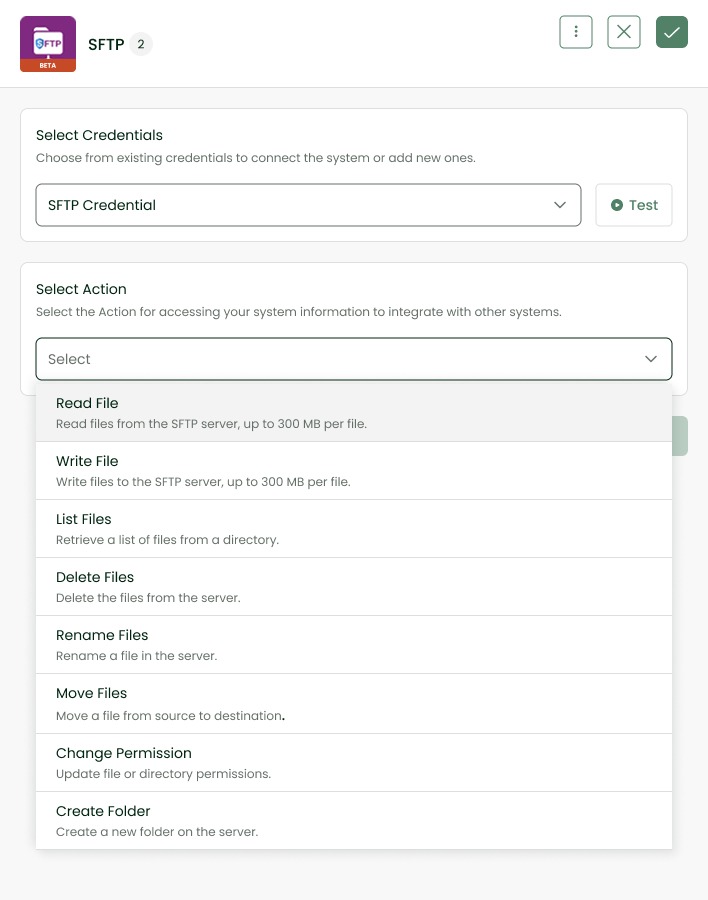
| Action | What it does | Returns data? |
| Read File | Reads a file and returns its contents, optionally converted to another format. | Yes |
| Write File | Writes data to a file, optionally converting it first. | No |
| List Files | Lists the files and folders in a directory. | Yes |
| Delete File | Deletes a file. | No |
| Rename File | Renames a file in its current folder. | No |
| Move File | Moves a file to another folder. | No |
| Change Permission | Changes a file’s permission mode, such as 644. | No |
| Create Folder | Creates a folder, including any missing parent folders. | No |
Reading and writing files
Read File and Write File move file contents between your workflow and the server. Both support optional data format conversion, a choice of character set, and a file size limit
Data Format Conversion
What it does: Converts data between formats as part of the read or write, so you don’t need a separate transformation step.
Importance: Your server file and your workflow often need different formats. For example, a partner drops an Excel file, but your workflow works with JSON.
| Toggle | What happens |
| Off (default) | No conversion. The file is read, or the data is written, as-is, the same way as the older systems. |
| On | You pick a format from the dropdown and the data is converted during the read or write. |
Supported formats: String, JSON, CSV, and XML String.
If conversion fails, the step stops. Nothing is returned (Read) or written (Write). You get a clear message that explains the conversion failed and what to check, for example: Unable to convert the file data to JSON format. Please verify the file content and selected output format.
File size limit
Reads and writes are limited to 300 MB by default, and the current limit is shown on screen when you select Read or Write. This limit is set in the Integrator application server configuration, so it can’t be changed by users or their teams. If you need a higher limit, contact us and we can increase it based on your requirements.
- Read: The file size is checked before anything is downloaded. If the file is over the limit, the read stops and you get an error saying the file exceeds the maximum allowed size.
- Write: The data size is checked before anything is written. If it is over the limit, nothing is written to the server and you get an error.
Character set
The character set tells the system how text in the file is encoded. Use UTF-8 (the default) unless the file owner tells you otherwise.
| Action | Options |
| Read File | UTF-8 (default), US-ASCII, ISO-8859-1, Latin-1 |
| Write File | UTF-8 (default), US-ASCII, ISO-8859-1 |
Tip: If a read returns strange symbols in place of accented letters, the file probably uses a different character set. Try ISO-8859-1.
Read File
What it does: Reads a file from the server and returns its contents to your workflow.
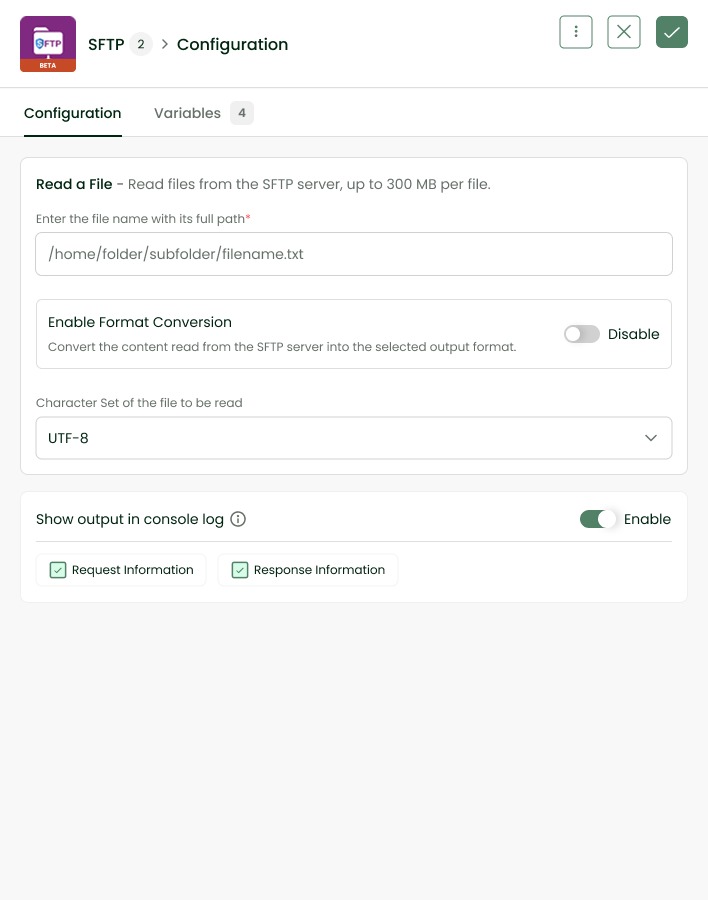
| Field | What to enter | Example |
| Enter the file name with its full path (starting from the root directory) | The full path to the file, including the file name. | /home/folder/subfolder/filename.txt |
| Expected Output Format | The format you want the contents returned in. Available when Data Format Conversion is on. | String (default), CSV, JSON, XML String |
| Character Set of the file to be read | The encoding of the file. | UTF-8 |
How to use it:
- Add an FTP or SFTP step to your workflow and select your credential.
- Choose Read File.
- Enter the full file path.
- To convert the data, turn on Data Format Conversion and choose the Expected Output Format.
- Choose the character set, or keep UTF-8.
- Run the workflow.
The step returns the file contents in the data field, in the format you chose. The run reports its progress, for example that the read completed and the conversion is in progress, so you can see where a failure happened.
Example 1: read a CSV file as JSON.
The file /website/data/products.csv holds this data:
| product_id | description | price | name |
| 1 | A powerful smartphone with high-resolution display and advanced features. | 499.99 | Smartphone |
| 2 | A sleek and powerful laptop for work and entertainment. | 899.99 | Laptop |
| 3 | 149.99 | Headphones |
With Expected Output Format set to JSON, each row becomes an object:
[

   {

       "product_id": "1",

       "description": "A powerful smartphone with high-resolution display and advanced features.",

       "price": "499.99",

       "name": "Smartphone"

   },

   {

       "product_id": "2",

       "description": "A sleek and powerful laptop for work and entertainment.",

       "price": "899.99",

       "name": "Laptop"

   },

   {

       "product_id": "3",

       "description": null,

       "price": "149.99",

       "name": "Headphones"

   }

]
Note two things. Empty cells come back as null. Values are returned as text, so “499.99” is a string, not a number.
If you try to read with expected output format as CSV, the output will be
product_id,name,price,description
1,Smartphone,499.99,A powerful smartphone with high-resolution display and advanced features.
2,Laptop,899.99,A sleek and powerful laptop for work and entertainment.
3,Headphones,149.99
Example 3
Suppose you have a text file named ‘order_details.txt’ in the root directory.
| Thank you for choosing [E-Shopify]! Your order (#123456) is being processed: Items:1. Smartphone – $499.992. Laptop – $899.993. Headphones – $149.99Total: $1549.97 Shipping: Free Shipping: 1234 Elm St, Springfield, MABilling: 5678 Oak Ave, Riverside, CA Payment: Credit Card (Completed)For assistance, contact support@eshopify.com or (800) 123-4567. Thanks for shopping with us! |
When you read the text file with expected output format as String, the output will be a string as shown below.
Thank you for choosing [E-Shopify]! Your order (#123456) is being processed:
Items:
1. Smartphone – $499.99
2. Laptop – $899.99
3. Headphones – $149.99
Total: $1549.97
Shipping: Free
Shipping: 1234 Elm St, Springfield, MA
Billing: 5678 Oak Ave, Riverside, CA
Payment: Credit Card (Completed)
For assistance, contact support@eshopify.com or (800) 123-4567.
Thanks for shopping with us!
Output Structure: The output of Read will be a dictionary with three keys:
status_code: 200 on success; 500 on failure.
data: contents of the file read.
message: success/failure message of the read action.
Write File
What it does: Writes data from your workflow to a file on the server.
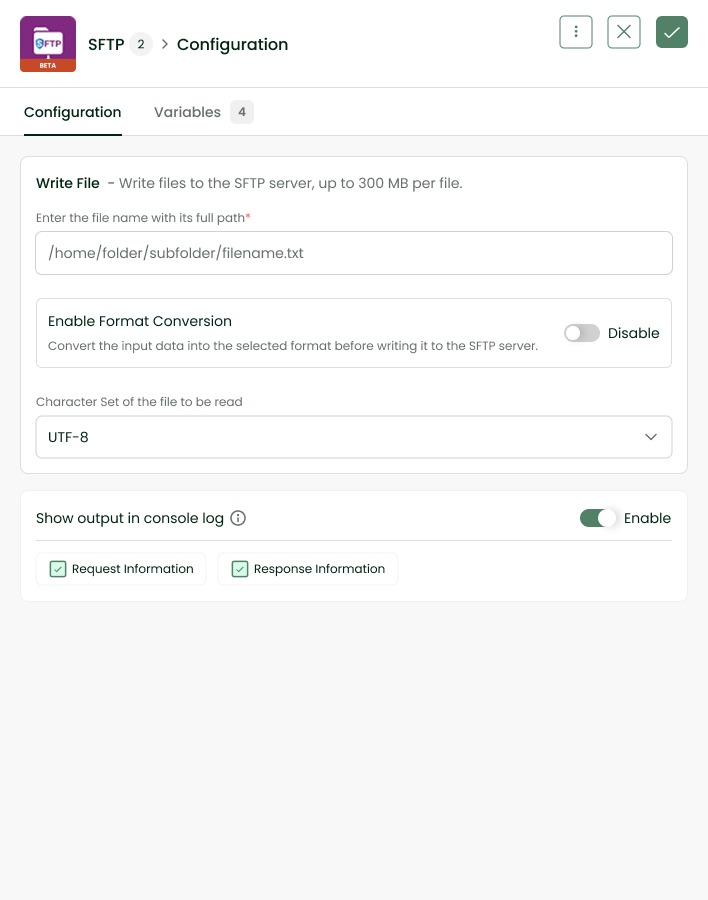
| Field | What to enter | Example |
| Enter the file name with its full path (starting from the root directory) | The full path of the file to write, including the file name. | /home/folder/subfolder/filename.txt |
| Input Data Format | The format the data is converted to before it is written. Available when Data Format Conversion is on. | String (default), CSV, JSON, XML String. |
| Character Set of the file to be written | The encoding to use. | Encoding character set for the file to be written. By default, it is UTF-8. charsets |
| Data to be Written to File | The content: typed directly, a list, or a DataHub value. | If the data is to be written in CSV format, provide the input as a nested array, either directly or via datahub. |
How to use it:
- Add an FTP or SFTP step to your workflow and select your credential.
- Choose Write File.
- Enter the full path, including the file name and extension.
- Provide the data, directly or from DataHub.
- To convert the data, turn on Data Format Conversion and choose the format.
- Choose the character set, or keep UTF-8.
- Run the workflow.
The file is created on the server at the path you entered, and the step returns a success message.
Writing CSV: Provide the data as a nested array, meaning a list of rows where each row is a list of values. You can enter it directly or pass it from DataHub.
Example: write JSON data as an CSV file. Your data does not need to be in the target format already. The system converts it.
- File path: /home/users/report.csv
- Data Format Conversion: On
- Input Data Format: CSV
- Character Set: UTF-8
- Data:
[

  {"name": "Aron", "age": 24, "city": "Texas"},

  {"name": "Loki", "age": 22, "city": "Dallas"}

]
Result: A CSV file named report.csv is written to /home/users. If the data is sent as a JSON string, it is parsed first and then converted.
The data is checked against the size limit, converted if needed, saved to a temporary file, and uploaded. The temporary file is always deleted afterwards, including when a step fails, so no copies of your data are left behind.
Managing files and folders
These six actions organize files on the server. Each takes one or two paths and returns a success or failure message.
List Files
Lists the files and folders inside a directory.
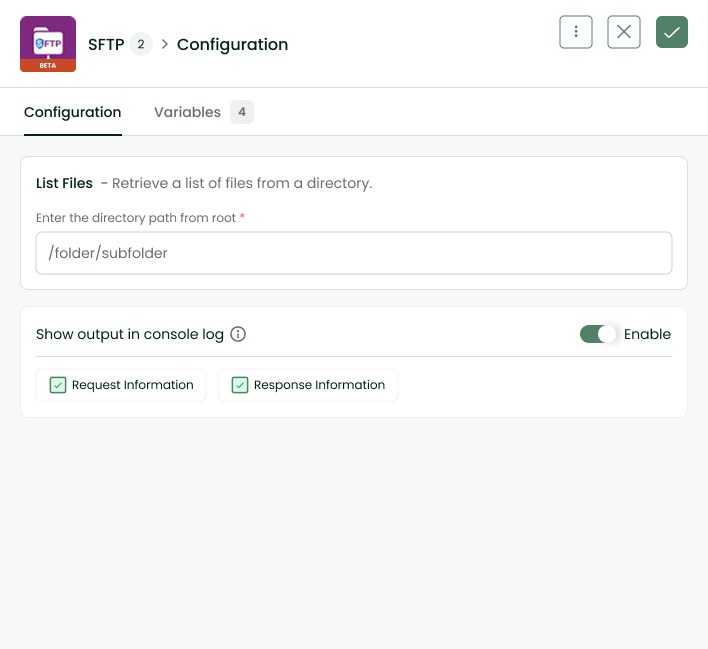
| Field | What to enter | Example |
| Enter the directory path from root | The full path of the directory. Use / for the root directory. | /folder/subfolder |
Expected outcome: A list of names in the data field, for example:
[“FTPDatafileSheet1.csv”, “mydirectory”, “Pictures Folder”, “Orders”, “consolidated_version.txt”]
Files and folders appear together in one list, by name only.
Delete File
Permanently deletes a file.
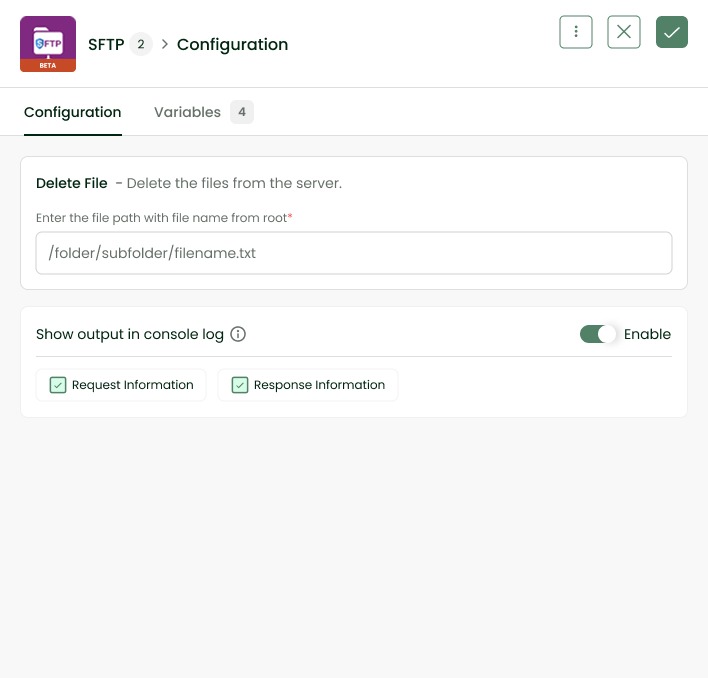
| Field | What to enter | Example |
| Enter the file path with file name from root | The full path, including the file name. | /folder/subfolder/filename.txt |
Warning: Check the path carefully before running Delete File in a workflow. The source documents do not describe any way to recover a deleted file.
Rename File
Renames a file and keeps it in the same folder.
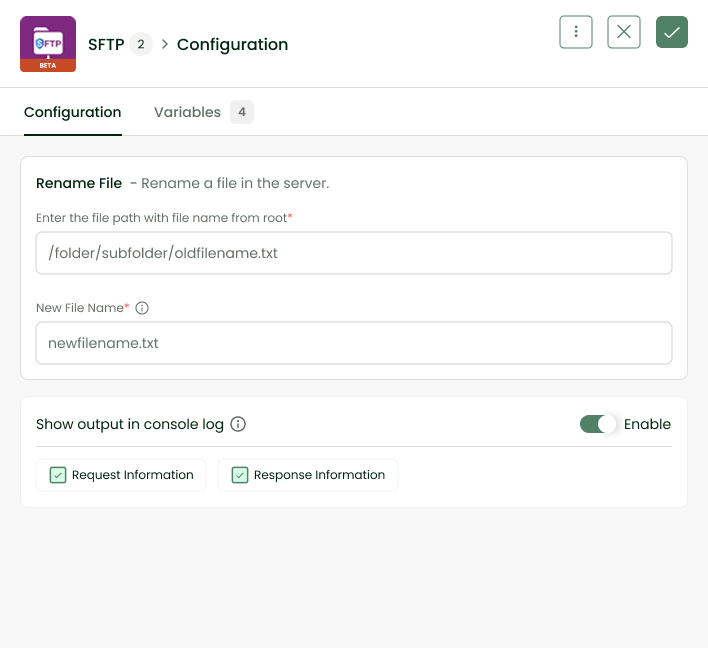
| Field | What to enter | Example |
| Enter the file path with file name from root | The full path of the file to rename. | /folder/subfolder/oldfilename.txt |
| New File Name | The new name with its extension. No path. | newfilename.txt |
Move File
Moves a file to another folder and keeps its name.
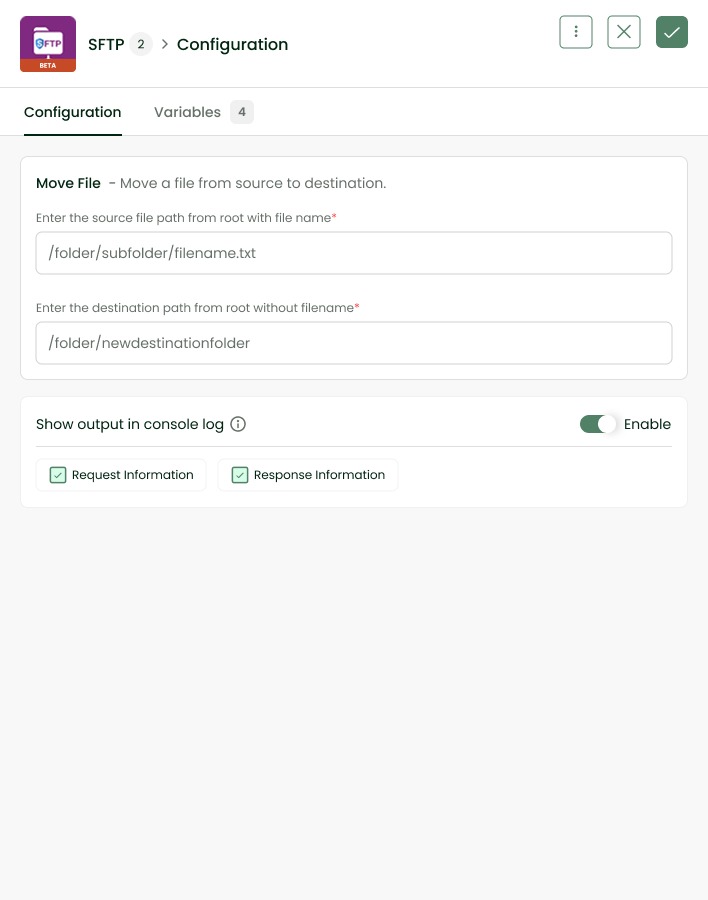
| Field | What to enter | Example |
| Enter the source file path from root with file name | The full path of the file to move, including the file name. | /folder/subfolder/filename.txt |
| Enter the destination path from root without filename | The full path of the destination folder. No file name. | /folder/newdestinationfolder |
Tip: To move and rename a file, run Move File, then Rename File on the new location.
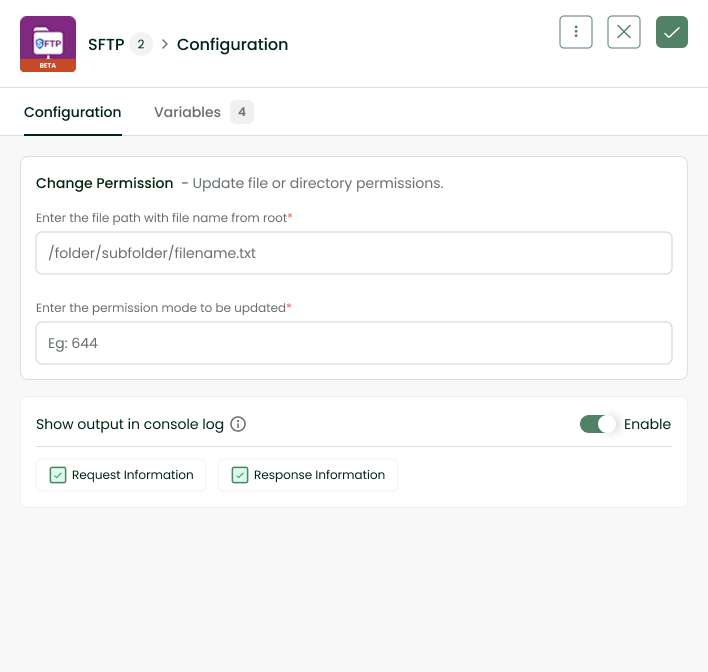
Change Permission
Changes who can read, write or run a file on the server.
| Field | What to enter | Example |
| Enter the file path with file name from root | The full path of the file. | /folder/subfolder/filename.txt |
| Enter the permission mode to be updated | The permission mode as a number. | 644 |
A permission mode is a three-digit code used by most servers. For example, 644 usually means the owner can read and change the file, while everyone else can only read it. Ask your server administrator which mode to use.
Create Folder
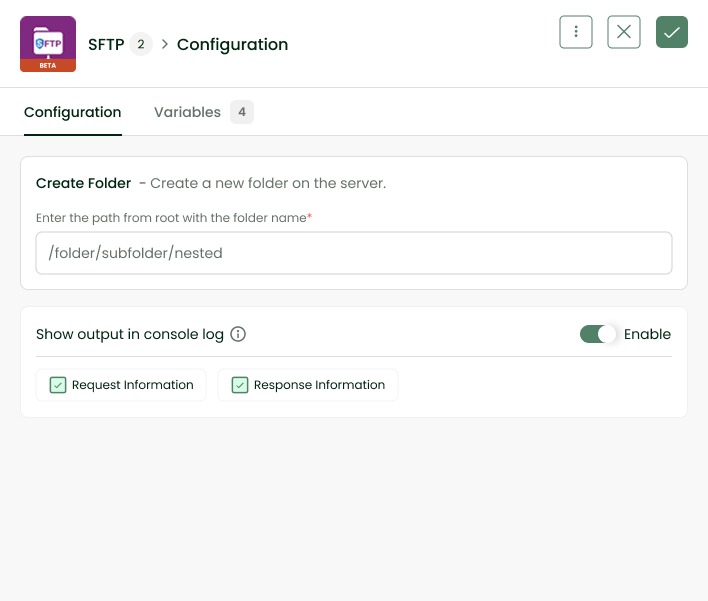
Creates a folder, and any missing folders along the path.
| Field | What to enter | Example |
| Enter the path from root with the folder name | The full path, ending with the new folder’s name. | /folder/subfolder/nested |
Example: Your server has only /folder. Running Create Folder with /folder/subfolder/nested creates subfolder inside folder, and then nested inside subfolder.
Troubleshooting
When an action fails, it returns status_code 500 and a message explaining the problem. Use the table below to find the likely cause.
| Problem | Likely cause | What to do |
| Invalid credentials | Wrong username, password or private key. | Edit the credential and re-enter the details. For SFTP, paste the full .pem contents. |
| Server unavailable or unreachable | Wrong hostname or port, or the server is down. | Check the hostname has no http:// or https:// and the port is correct. Confirm with your server administrator that the server is running. |
| Connection failure | Network issue, or the wrong SSL/TLS setting for FTP. | The system retries failed connections automatically. If it keeps failing, check FTP over SSL/TLS Support matches your server. |
| File or directory not found | The path is wrong or incomplete. | Use the full path from the root directory. Run List Files on the parent folder to confirm the name. |
| Insufficient permission | The server account cannot perform the action. | Ask your server administrator to grant access to that file or folder. |
| Invalid file path or input | A field is in the wrong form. | Rename File takes a name only, with no path. Move File’s destination takes a folder only, with no file name. |
| File exceeds maximum allowed size | The file or data is over the limit (300 MB by default). | Split the file into smaller parts, or ask your platform team whether the limit can be raised. |
| Format conversion failed | The data does not fit the selected format. | Check that the data matches the format. For example, CSV input must be a nested array. Or turn conversion off. |
| File read/write failure | The transfer could not complete. | Run the step again. If it repeats, check server space and permissions with your administrator. |
| Operation timeout or transfer failure | A slow or interrupted connection. | Run the step again. Check file size and network stability. |
Limits, security and reference
Limits at a glance
| Item | Current behavior |
| File size (Read and Write) | 300 MB by default, configurable by the platform team. |
| Format conversion | Read File and Write File only. Off by default. |
| Workflow variables | Supported where applicable. |
| Role-based permissions | Not available at this time. |
| Notifications | None. Check results in the workflow run. |
| Older FTP/SFTP systems | Unchanged. |
FAQ
Do I need to rebuild my existing FTP/SFTP workflows?
No. The older systems and their workflows are unchanged. Use the Beta Systems for new workflows.
Can I use a password and a private key together for SFTP?
No. Use one or the other.
Does the file have to be in the output format already?
No. Conversion changes the format for you, for example from XLSX to JSON.
What happens if I leave conversion off?
The file is read, or the data is written, as-is.
Why can’t I delete a credential?
It is still used in at least one workflow. Remove it from those workflows first.
Can I process a file larger than 300 MB?
Not with the default limit. Split the file, or ask your platform team about raising the limit.
Glossary
| Term | Meaning |
| FTP | File Transfer Protocol. A standard way to move files between computers. |
| SFTP | SSH File Transfer Protocol. A secure, encrypted way to move files. |
| FTP over SSL/TLS | FTP with encryption added. |
| Credential | A saved connection to one FTP or SFTP server. |
| Private key (.pem) | A key file used to sign in to SFTP instead of a password. |
| Root directory | The top-level folder on the server, written as /. |
| Full path | A file or folder location starting from the root, such as /home/data/file.csv. |
| Character set | How text in a file is encoded, such as UTF-8. |
| Nested array | A list of lists. For CSV, each inner list is one row. |
| Permission mode | A number, such as 644, that sets who can read, write or run a file. |
| DataHub value | Data passed into a step from DataHub instead of typed directly. |